That trusty flashlight sitting in your drawer or glove compartment seems almost trivially simple. Click a switch, and darkness retreats. But have you ever paused to consider the clever, yet straightforward, engineering packed into that humble tube? It’s a beautiful example of basic physics put to practical use, a miniature power plant and light projector all in one handheld device. Understanding how it works reveals a neat little journey of energy conversion and control.
Peeking Inside: The Cast of Components
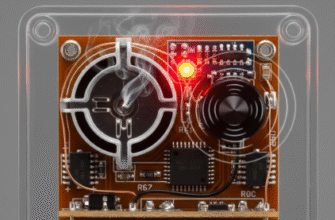
Let’s unscrew a typical, old-school flashlight – the kind many of us grew up with, using a traditional bulb rather than modern LEDs. Inside, we find a surprisingly small number of key parts working together seamlessly. Each piece has a specific job to do in the chain reaction that ultimately produces light.
The Case (Housing)
This is the outer shell, usually made of plastic or metal (often aluminum). Its primary role is structural: it holds everything else together in the right alignment. It also protects the delicate inner workings from bumps, drops, moisture, and dirt. The case often doubles as part of the electrical circuit, especially in metal flashlights, providing a path for the electricity to travel.
Batteries: The Powerhouse
No power, no light. The batteries are the heart of the flashlight, storing chemical energy ready to be converted into electrical energy. Most simple flashlights use standard disposable batteries like AA, C, or D cells. These batteries contain chemicals that react to produce a flow of electrons – an electric current – when a circuit is completed. They are typically loaded in series (positive end of one touching the negative end of the next) to increase the total voltage supplied to the bulb.
The Switch: Master Controller
This is your interface with the flashlight. The switch is a mechanical device designed to do one simple thing: open or close the electrical circuit. When you slide or push the switch to the ‘on’ position, it moves a contact piece to bridge a gap, allowing electricity to flow from the batteries to the lamp. Flick it ‘off’, and it breaks this connection, interrupting the flow and turning off the light. Switches come in various forms – sliders, push-buttons, twist mechanisms – but the principle remains the same.
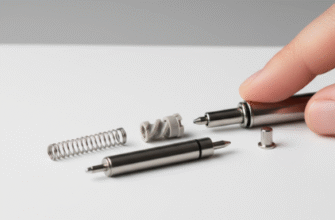
Contacts and Springs: The Conductive Pathway
Look closely inside, and you’ll see thin metal strips, plates, or springs. These are the electrical contacts. Their job is crucial: they form the conductive path for the electricity to travel between the batteries, the switch, and the lamp assembly. A spring, often found at the base of the battery compartment, serves a dual purpose: it pushes the batteries firmly against the contacts to ensure a good connection and also acts as a conductor itself, completing the circuit back to the negative terminal of the last battery.
The Lamp (Bulb): Where Light Happens
In a traditional flashlight, the lamp is usually a small incandescent bulb. Inside this bulb’s glass envelope (often filled with an inert gas like argon to prolong life) is a tiny, coiled wire called a filament, typically made of tungsten. Tungsten is used because it has a very high melting point. When electricity flows through this thin filament, it encounters resistance. This resistance causes the filament to heat up dramatically – to thousands of degrees – until it glows white-hot, producing visible light. This process is called incandescence.
The Reflector: Gathering and Directing
The light produced by the filament radiates in all directions. To create a useful beam, this scattered light needs to be gathered and pointed forward. This is the job of the reflector, a cone-shaped piece (usually plastic coated with a shiny metallic layer or polished metal) positioned behind the bulb. It’s carefully shaped, often like a parabola, so that light rays hitting its surface are reflected outwards in a relatively parallel beam. This concentrates the light, making it much brighter and more focused than the bare bulb would be.
The Lens: Protection and Focus
Sitting at the very front of the flashlight is the lens, typically a clear piece of plastic or glass. It primarily serves to protect the fragile bulb and the reflector surface from dust, scratches, and moisture. In some flashlights, the lens might also have some curvature or texturing to help shape or diffuse the beam slightly, complementing the work of the reflector.
Putting It All Together: The Electrical Journey
Now, let’s trace the path of electricity when you turn the flashlight on. It’s a complete loop, a circuit.
1. Chemical energy stored in the batteries begins to convert into electrical energy. Electrons start flowing from the negative terminal of the battery stack.
2. These electrons travel through the conductive spring or contact at the base of the flashlight.
3. They move along a metal strip or wire (sometimes the flashlight case itself acts as this conductor) leading towards the switch mechanism.
4. When the switch is flipped to ‘on’, it completes the connection, allowing the electrons to flow through the switch contacts.
5. From the switch, the current travels through another conductive path (strip or wire) leading to one of the electrical contacts on the lamp assembly (often the side or base).
6. The current enters the bulb and flows through the thin tungsten filament.
7. Resistance in the filament causes it to heat up intensely and emit light (and quite a bit of heat – incandescent bulbs are not very energy efficient!).
8. After passing through the filament, the current exits the bulb via its other contact point (often the central tip at the bottom).
9. This contact touches another conductive strip or part of the reflector assembly, which leads the current back towards the positive terminal of the battery stack.
10. Entering the positive terminal completes the circuit. This continuous flow happens instantaneously when the switch is closed, providing power to the bulb.
A simple flashlight operates on a fundamental electrical principle: creating a closed loop or circuit. The batteries provide the voltage (electrical pressure), the switch controls the flow, and the bulb filament acts as the load, converting electrical energy into light and heat when the circuit is complete. Interrupting this loop anywhere, such as opening the switch or a loose connection, stops the current flow.
Flip the switch to ‘off’, and you simply create a gap in this pathway, usually between the switch contacts. The flow of electrons stops, the filament cools down, and the light goes out. It’s elegant in its directness.
Shaping the Beam: Reflector and Lens Working in Tandem
The bulb itself just creates a point of light. Without the reflector and lens, you’d have a very dim, omnidirectional glow, not very useful for seeing anything specific in the dark. The magic of creating a focused beam lies in the geometry of the reflector.
Ideally, the reflector has a parabolic shape, and the bulb’s filament is positioned precisely at the focal point of this parabola. Physics tells us that light rays originating from the focal point of a parabola will bounce off the parabolic surface and travel outwards parallel to the axis of the parabola. This creates a concentrated, relatively straight beam of light. In reality, the filament isn’t a perfect point source, and the parabola isn’t perfectly manufactured, so the beam isn’t perfectly parallel, but it’s vastly more effective than a bare bulb.
The lens adds the final touch, protecting these critical components. While most simple flashlight lenses are flat and primarily protective, some designs incorporate focusing mechanisms where twisting the flashlight head moves the bulb relative to the reflector, allowing the user to adjust the beam from a wide flood to a narrow spot. This works by slightly altering the filament’s position relative to the reflector’s focal point.
Modern Twists: The Rise of LEDs
While we’ve focused on the classic incandescent flashlight, it’s impossible to ignore the prevalence of LED (Light Emitting Diode) technology today. LED flashlights work on the same fundamental principle of a complete circuit powered by batteries and controlled by a switch. However, the light generation method is entirely different and much more efficient.
Instead of heating a filament, an LED uses a semiconductor chip. When current flows through this chip in the correct direction, electrons release energy directly in the form of photons (light). This process, called electroluminescence, generates far less heat and converts electricity into light much more efficiently than incandescence. This means LEDs produce brighter light for longer using the same battery power, and the LEDs themselves last vastly longer than fragile incandescent bulbs.
Despite the different light source, the rest of the simple flashlight’s architecture – the case, batteries, switch, contacts, reflector (though often optimized for the LED’s output), and lens – serve the same essential functions.
When the Light Fails: Simple Troubleshooting
Because the design is so straightforward, fixing a non-working flashlight is often easy.
- Check the Batteries: Are they dead? Are they inserted correctly (positive and negative ends aligned properly)? Try fresh batteries.
- Check the Bulb: Incandescent filaments can burn out. Look closely at the filament inside the bulb. If it’s broken, the bulb needs replacing. (Less common with durable LEDs).
- Check the Contacts: Battery terminals and the metal contact strips inside the flashlight can corrode or get dirty, preventing good electrical flow. Clean them gently with a pencil eraser or a cotton swab lightly dampened with rubbing alcohol (ensure batteries are removed first and let it dry completely). Ensure the spring is making firm contact.
- Check the Switch: Sometimes the switch mechanism itself can fail or get dirty internally. Try flicking it on and off firmly a few times.
Always handle batteries properly. Do not mix old and new batteries, or different battery types. Leaking batteries can cause corrosion and skin irritation; handle them carefully and clean any residue thoroughly. Dispose of batteries according to local regulations.
Elegance in Simplicity
The humble flashlight is a testament to how fundamental principles of electricity and optics can be harnessed in a simple, reliable, and incredibly useful device. From the chemical potential in the batteries to the controlled flow through the switch, the conversion to light in the bulb (or LED), and the shaping of that light by the reflector and lens, each part plays its role perfectly. The next time you click on your flashlight, take a moment to appreciate the straightforward brilliance packed inside that simple tube – a small marvel of engineering that reliably cuts through the darkness.